domenica 13 maggio 2012

Happy mother's day

Di solito non festeggio questo tipo di giornate - della mamma, del papà, degli innamorati... non so, per me sanno un po' troppo di consumismo e ipocrisia. Questo non vuol dire che non mi piaccia fare regali ai miei genitori o a chi amo, anzi; quindi per quest'anno mi adeguo alla massa e per festeggiare la mia mamma ecco qui questo mazzo di tulipani (come quelli del post precedente) che ho fatto stamattina per lei.


Per rendere più realistici i miei tulipani per la mamma, ho voluto creare un effetto rosa sfumato, e l'ho fatto semplicemente picchiettando dell'acquarello fucsia molto molto diluito sul feltro bianco con un pennello a zoccolo alla base del fiore. Semplice ma d'effetto, come piace a me :)
Buona festa della mamma a tutte!

venerdì 4 maggio 2012

Terzo tutorial (oramai ci ho preso gusto): tulipani di feltro

I tulipani sono decisamente tra i miei fiori preferiti, se non quelli che amo di più in assoluto. Sarà per il loro essere così tondi e grassocci (a me le cose paffute piacciono un sacco), sarà perché hanno una forma semplice ed essenziale (che mi piacciono questo tipo di cose s'era già capito); fatto sta che poter trasformare casa mia in un giardino invaso da enormi mazzi di freschi e vigorosi tulipani sarebbe per me come vivere in un sogno. Il problema è che i fiori recisi mi fanno una tristezza incredibile. Non sopporto proprio vederli appassire pian piano e poi morire miseramente in un vaso con un po' d'acqua (per non parlare della scocciatura di cambiarla ogni giorno che sennò puzza). Soluzione? Ma dei morbidissimi (ed immortali!) tulipani di feltro, ovviamente :)
Tulips are among my favourite flowers, and I often think how nice it would be to have my house always full of wonderful tulip bouquets. However, I don't really like cut flowers 'cause it makes me really sad watching them die poorly in a vase (not to mention the nuisance of changing the water daily or else it smells bad) . The solution? None other than some super-soft (and immortal!) felt tulips, of course!


Ecco quello di cui avrete bisogno per creare in vostri tulipani feltrosi:
- ago
- spilli
- forbici (sempre appuntite ed affilate)
- feltro verde per il gambo (la tonalità che preferite, io ho usato un verde menta pastello)
- feltro colorato per la corolla (potete sbizzarrirvi, ma tenete presente che il risultato migliore si ottiene con colori chiari)
- filo verde (della stessa tonalità del feltro)
- filo colorato (di diverse tonalità più scuro rispetto al feltro per la corolla; ad esempio, su feltro rosa pastello ci va del filo fucsia o viola)
- imbottitura sintetica
- carta, stampante, matita e righello per le sagome.

Here's what you'll need to make some felty cute tulips:
- needle
- pins
- sharp scissors
- green felt for the stem (the shade you prefer, I used a pastel mint green)
- coloured felt for the petals (best result with light colours)
- green thread (matching the green felt)
- coloured thread (use darker shades of the same colour you choose for the felt; e.g. on a pale pink felt you will use a fuchsia or violet thread)
- some polyfill
- paper, printer, pencil and ruler for the template.

1. Stampate la sagoma della corolla dalla foto qui sotto mantenendo le dimensioni originali, e ritagliatela. Ritagliate una striscia di carta di 14x1cm per il gambo.
Fissate la striscia di carta al feltro con degli spilli. Ritagliate due gambi di feltro verde, sovrapponeteli e fissateli. [NOTA: le misure del fiore e del gambo sono pensate per un vasetto di circa 8cm di altezza. Per vasi di dimensioni maggiori, l'immagine da stampare va ingrandita.]
1. Print full-size the template of the flower and cut it out. Using a ruler, sketch a strip of 14x1cm; this will be the stem. Fix the paper stem on the green felt with some pins and cut out two felt stems. [NOTE: this flower has the dimension meant for a vase 8cm height. Enlarge the print if needed.]


2. Cucite assieme le due sagome partendo da uno degli angoli lungo il lato maggiore del gambo, come in figura. 
2. Sew together the two felt stems starting from one corner and going on through the lenght of the stem, as shown.


3. Lasciate aperto uno dei lati corti del gambo e inseriteci l'imbottitura, poi chiudete. Il gambo è così pronto. NOTA: abbondate con l'imbottitura pigiandola bene lungo tutta la lunghezza del gambo, che deve risultare solido e duro abbastanza da restare ritto nel vaso.
3. Leave a gap on one of the shorter sides and stuff your stem with polyfill, then close. The stem is now ready. NOTE: use all the stuffing it takes to make the stem sturdy and solid, pushing the polyfill all through the lenght of the stem.


4. Passate alla corolla, ripetendo i passaggi eseguiti per il gambo. Iniziate a cucire il vostro fiore dalla base lasciando circa 2cm di apertura per inserire l'imbottitura e il gambo.
4. As for the stem, cut two flowers of felt and sew them together starting from the bottom (see second picture), leaving a 2cm gap for the stuffing and the stem.


5. Imbottite il tulipano aiutandovi con un attrezzo dalla punta arrotondata (io ho usato il solito pennello). La corolla non necessita di un'imbottitura compatta come il gambo; imbottite il vostro fiore a piacimento. Quando vi sembra gonfio abbastanza, inserite il gambo per circa 1cm e fissatelo al fiore con uno spillo, quindi chiudete.
5. Stuff the tulip as puffy as you like; insert 1cm of the stem in the flower and fix it with a pin, then sew to close.


6. "Trapuntate" il vostro fiore per creare l'illusione dei petali partendo dall'alto verso il basso, dal punto indicato nella foto. CONSIGLIO: cucite punti piccoli e controllate ad ogni punto che la retta che state tracciando stia curvando verso il gambo parallela alla curva esterna del fiore. Se non siete capaci a cucire una linea tondeggiante "a mano libera", potete provare a segnare una traccia leggera sul feltro con una matita o una penna... io non l'ho mai fatto, né in questo né in altri casi (quindi non mi assumo la colpa di eventuali disastri!) però c'è chi lo consiglia in diversi tutorial in rete. Provate, e poi fatemi sapere :D
6. "Quilt" your flower from the top down, starting from the point shown in the picture. TIP: use small stitches and make sure the curve you're stitching goes parallel to the external curved side of the flower. You can try to mark a line with a pencil or pen if you find it hard to sew "freehand"... I've never tried to write on felt (so don't blame me if the result is a disaster!), but I've read somewhere that it works fine. Try and let me know :D


7. Mentre cucite, tirate fermamente il filo per creare i rigonfiamenti dei petali.
7. While sewing, pull firmly the thread so the petals will look puffy.


Et voilà! Un bel mazzo di tulipani di feltro e a casa sarà sempre primavera!
Et voilà! A nice tulip bouquet will bring spring in your home forever!


Per favore, rispettate il mio lavoro e la mia creatività: se volete realizzare e pubblicare sul vostro blog un tulipano partendo da questo tutorial, siete gentilmente pregati di citarne la fonte con un link a questo post. La vendita di questo tutorial, di tulipani realizzati seguendo questo tutorial  e la riproduzione per intero di questo tutorial su un altro sito sono espressamente vietate. Grazie!
Please, respect my work and my creativity: if you want to make a tulip from my tutorial or to blog about this project, remember to credit me and link back to this post. Do not reproduce my entire tutorial on your site. This tutorial is for non commercial use only. Thank you!


domenica 15 aprile 2012

Come creare un girasole gigante da appendere. In feltro, ovviamente ;)

Quanta allegria mette un girasole gigante, in una giornata di pioggia come questa!
I feel happy looking at this giant sunflower, even if the weather is cold and rainy today.


Sono molto contenta di pubblicare il mio secondo tutorial. Purtroppo la scarsa luce di oggi non mi ha permesso di fare delle foto decenti... accontentatevi.
Il procedimento per realizzare questo ManuFatto non è difficile ma è un po' lungo e ci vuole un bel po' di feltro; però secondo me il risultato è bellissimo, quindi ne vale la pena :) Tutto quello di cui avrete bisogno per creare il vostro girasole gigante è:
- ago
- filo nei colori marrone e giallo
- forbici (molto affilate e appuntite)
- spilli
- feltro marrone (2 cerchi di 10cm di diametro) e giallo (4 fogli da 20x20cm)
- spago di canapa
- lana sintetica per imbottiture
- carta e matita
Even though the sunlight was poor today and the pics came out a little blurry, I'm actually proud of my second tutorial on this blog :) This project is quite easy to make, but it requires a fair amount of time (and of felt, too). Anyway, I think the result is so pretty it's worth the time and price.
So, all you need to make your own sunflower is:
- needle 
- thread (brown and yellow)
- pins
- brown felt (2 circles of 10cm of diameter)  and yellow felt (approximately 3 squares of 20x20cm)
- hemp twine
- polyester stuffing
- paper and pencil


1. Prendete carta e matita e schizzate un petalo e un cerchio nelle misure riportate nell'immagine, quindi ritagliateli.
1. Sketch a circle and a petal on a piece of paper (see the image for measures), and cut them out.

2. Ritagliate 28 petali di feltro giallo e 2 cerchi di feltro marrone, usando le sagome che avete disegnato. 
2. Cut out 28 petals of yellow felt and 2 circles of brown felt.


3. Sovrapponete due petali e cuciteli assieme, partendo dal punto indicati nell'immagine e lasciando un'apertura alla base (servirà per inserire l'imbottitura). In totale avrete 14 petali da imbottire.
3. Overlap two petals and sew them together, starting from the point shown in the picture, leaving an opening at the base (from where you'll insert the stuffing). You'll have 14 petals in total.


4. Imbottite leggermente i petali con della lana sintetica.
4. Stuff the petals slightly.


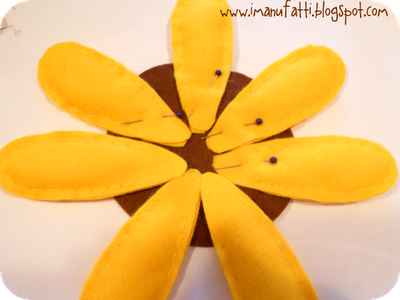
5. Prendete uno dei due cerchi di feltro marrone e posizionatevi 7 petali, come indicato nell'immagine, quindi fissateli con degli spilli.
5. Take one brown circle and place 7 petals on it as shown, then secure them with pins.


6. Cucite i petali al cerchio marrone con due semplici punti alla base (la foto non è venuta benissimo così ci ho messo delle frecce a indicare dove vanno cuciti i petali). I petali così cuciti resteranno un po' mobili, il che va benissimo.
6. Stitch the petals to the brown circle with a few stitches (the picture is blurry so I've added some arrows pointing to the stitches). It's ok if the petals are able to move a bit.


7. Posizionate i rimanenti 7 petali come in figura, fissateli con gli spilli e cuciteli, come al punto 6.
7. Place the other 7 petals as shown, fix them with pins and stitch them, as on step 6.


8. Prendete dello spago di canapa nella lunghezza necessaria ad appendere il girasole (io ho usato circa 40cm di spago piegato a metà) e unite le due estremità con un nodo. Quindi cucite lo spago (poco sopra il nodo) al cerchio di feltro marrone, dietro ad un petalo (come nell'immagine).
8. Use the necessary lenght of hemp twine (I used 40cm approximately) and tie the ends with a knot. Sew the hemp twine behind a petal on the brown circle of felt, just above the knot (see the image).


9. Posizionate il secondo cerchio di feltro marrone al centro del fiore, fissatelo con degli spilli e cucitelo, lasciando un'apertura di 2cm per inserire l'imbottitura. ATTENZIONE: man mano che cucite, controllate la posizione dei petali, che come ho detto sono rimasti un po' mobili appunto per poterli sistemare al meglio una volta aggiunti tutti i petali. Dopo questo passaggio, i petali saranno definitivamente fissi e immobili al loro posto, quindi fate attenzione!
9. Place the second brown circle of felt to the center of the flower, secure it with pins and sew it, leaving a 2cm opening for the stuffing. ATTENTION: as you sew, take care of the position of the petals; as I said, they can move a bit so you can put them on the right place after you've added the second round of petal to your flower. After this step, the petals will be fixed and they'll be no longer able to move, so pay attention!


10. Cucite una specie di "trapuntatura" sul cerchio marrone del vostro girasole, in diagonale rispetto all'attaccatura del filo di canapa.
10. "Quilt" the center of the flower as shown.


Ed ecco fatto, il vostro girasole gigante è pronto a portare luce ed allegria nella vostra casa...
That's it, your giant sunflower is ready to bring some light and happiness to your home...


... o sul vostro balcone :)
...or to your balcony :)


Per favore, rispettate il mio lavoro e la mia creatività: se volete realizzare e pubblicare sul vostro blog un girasole partendo da questo tutorial, siete gentilmente pregati di citarne la fonte con un link a questo post. La vendita di questo tutorial o di girasoli realizzati seguendo questo tutorial non è ammessa, come non è ammessa la riproduzione per intero di questo tutorial su un altro sito. Grazie!
Please, respect my work and my creativity: if you want to make a sunflower from my tutorial or to blog about this project, remember to credit me and link back to this post. Do not reproduce my entire tutorial on your site. This tutorial is for non commercial use only. Thank you!


lunedì 9 aprile 2012

Tè verde

Caspiterina, è da febbraio che non pubblico niente! In attesa del big event  (ovvero l'apertura del mio primo negozietto online) a cui sto lavorando come una forsennata nei ritagli di tempo che a fatica riesco a concedermi, ecco uno sneak peek della mia ultima fatica:
I know it's been soooo long since my last post, but I'm crafting like a fool lately to get everything ready for the big event (the opening of my etsy shop). So, all I can show you for now is a sneak peek of what I'm working on these days:


Cosa potranno mai diventare questi triangolini colorati ispirati alle tonalità del tè (in particolare di quello verde, che stavo appunto bevendo)?
I love the combination of colours I picked for these little triangles, inspired by green tea (which is what I was actually drinking). But what will they end up being?